*** IT সম্পর্কে দক্ষ হতে চান ? ** তাহলে নিয়মিত Visit করুন .... IT Knowledge School **** টেকপ্রেমী : বদিউজ্জামান ( রুবেল )
Blogger Tips and TricksLatest Tips And TricksBlogger Tricks
Showing posts with label Blogger Widgets. Show all posts

How to add Scrolling Blogger Title

→Go to Blogger Theme Layout

→ Add Gadget →HTML/Java Script→Paste below code →Save

<script type='text/javascript'>
//script by mistonline.in, please donot delete this.Thanks.
msg = "***Badiuzzaman ( Rubel )***";
msg = "IT Knowledge School" + msg;position = 0;
function scrolltitle() {
document.title = msg.substring(position, msg.length) + msg.substring(0, position); position++;
if (position > msg.length) position = 0
window.setTimeout("scrolltitle()",170);
}
scrolltitle();
</script>
Read More »

How to Create two Column Widget sidebar in Blogger

Looking for blogger widgets of two column widget sidebar in blogger? Learn here How to Create two Column Widget sidebar in Blogger
two Column Widget sidebar in BloggerIs you facing the problem of the not much space in the sidebar to add more widgets? Have you ever want to increase your sidebar widget space. Having an extra space of widget in the sidebar to add more widgets in the sidebar like social sharing widget,  is good. The best way to create an extra space in the sidebar is to create an extra two column widget sidebar in blogger. If you want to create extra two column widget sidebar in your template then you are at right place because in this post we are going to tell you how to create two columns widget sidebar.

Why to create widgetized sidebar?

If this question is also popping up in your mind that why you create extra two column widget sidebar then here is the answer, sometimes you may find your sidebar loaded with various widgets and you want to add some more important widgets in sidebar but you can't due to not much extra widget area. And ultimately in order to add some important widget you may remove the existing ones. But now stop worrying and let's see how you can add extra two column widget area in your sidebar.
Recommended Post:

  1. 11 Excellent CSS image hover effects for blogs

How to Create two Column Widget sidebar in Blogger

First to install the two column widget sidebar goto your blogger dashboard >> Template >> Edit HTML.

At their search for  ]]></b:skin>. And just above it paste the below chunk of the code.

#twosidebar-wrapper {
width: 152.5px;
float:right;
margin:0px;
padding:0px 0px 0px 0px;
word-wrap:break-word;
overflow:hidden;
background-color:fff;    }
#twosidebar-wrapper2 {
width: 152.5px;
float:right;
margin:0px;
padding:0px 0px 0px 0px;
word-wrap:break-word;
overflow:hidden;
background-color:fff;     }
After adding the above code now come to the next step.
Now again search for the below :

 <div id="rsidebar-wrapper">
If you can't find the above code then first find that what id is used in your template for sidebar. Because every template have different template structure. To find that what id used in your blogger template for sidebar follow the below steps:

  1.  Open your site's homepage
  2. Head over to your sidebar and right click on the sidebar and then click on the Inspect elements.
  3. Inspect elements shows you all the coding of the different page elements. When your revolve your mouse cursor on any chunk of code it will highlight that part of page which using that coding. 
  4. So now, At there hover your cursor on the coding and notice that which coding highlights the sidebar.
  5. After finding the sidebar coding now look for the first div element of the sidebar
  6. And that's the one which you want. Look at the screen shot below for better understanding.

Now after this again goto your blogger template >> HTML editor and search for the code which you got in the above steps. In my case it's
<div id="rsidebar-wrapper">

Now just above it paste the following below code and save your template:
<div id='twosidebar-wrapper '>
<b:section class='sidebar' id='sidebar' preferred='yes'>
</b:section>
</div>
<div id='twosidebar-wrapper2'>
<b:section class='sidebar' id='sidebar2' preferred='yes'>
</b:section>
</div> 

Voila!  :=) You have successfully installed the two column widget sidebar in blogger.
Read More »

Adding widgets on both sides of Blogger header

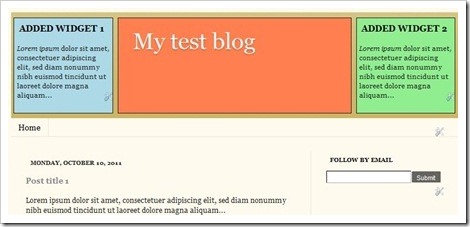
This tutorial is in response to requests from readers. Some readers asked how to add a widget on each side of the header as pictured below, while others asked how to place multiple widgets on the right side of the header.
This tutorial will answer both questions. It’ll show you how to add any number of widgets into the header area, and arrange them in any way you like (as long as it’s horizontal :) ).blogger widgets on left and right sides of header

It’s an improved version of my previous tutorial on similar customization: Add banner, Adsense or search box in header, as it doesn’t require the addition of a new widget container i.e. section.


1. Unlock the header section

You probably notice that you can’t add widgets to the header section in Layout. The reason for that is because it is locked. Blogger by default limits the header section to only one widget (the header).

Fortunately we can unlock it pretty easily. Go to Template > Edit HTML > Proceedand look for this line:
<b:section class='header' id='header' maxwidgets='1'showaddelement='no'>
replace it with this:
<b:section class='header' id='header' maxwidgets=''showaddelement='yes'>
What the new code does is removes the widget count limit, and adds the Add-A-Gadget link in the section.


2. Add widgets and get the IDs

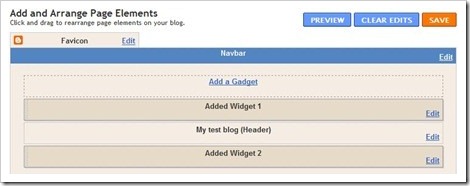
Go to Layout page and add in your widgets via Add-A-Gadget. Arrange them according to how you want them to appear on the actual blog. The topmost widget here will appear farthest to the left on the blog, and the bottommost one will appear farthest to the right.
unstyled header section
Once the widgets are saved, check the widget IDs by following this tutorial: How to find Blogger a widget ID. You need to know the IDs so you can address the widgets individually when styling them in the next step.


3. Add CSS code

By now you’ve added the widgets in the header, but they are stacked on top of each other. In this step you will make the widgets appear side by side, add margins or paddings etc. Note: The horizontal layout will not be reflected in Layout page i.e. the widgets will still appear to be stacked vertically.
  1. Go to Template > Customize > Advanced > Add CSS, enter the code below and press Enter key. Or you can paste it right before ]]></b:skin> in Edit HTML. 
  2.  .header .widget  {
    border1px solid;
    display:inline-block;
    *floatleft;
    height200px;
    overflowauto;
    margin10px 5px !important;
    vertical-aligntop;
    }

    .header #Header1 {
    width50%;
    }

    .header #widgetID1, .header #widgetID2 {
    width20%;
    }

     urceprint?

  3. Replace widgetID with the widget ID you get in previous step. Pay attention to the width property -you can set the widths to any values as long as the sum of all the widths, paddings, margins and borders of the widgets do not exceed the width of the header section. Otherwise the rightmost widget will be pushed below the rest of the widgets.
  4. Look at the preview pane while doing the adjustment, your goal is for the widgets to align nicely as pictured above.
  5. Click Apply To Blog button when done.
Enjoy!
Read More »

Badiuzzaman ( Rubel )